
1. Figure out the perfect TpT store name
- Make sure it includes your niche. It doesn’t make sense to have a store called Magical Mathematics if you plan on selling science and literacy resources. I would suggest creating a name that can include a range of resources but make sure to include some descriptive words to help a buyer know your area of expertise (i.e. Supporting Special Learners – my niche is special education resources).
- Make sure it is easy to remember. It shouldn’t be too long, and it should have a nice flow.
- Make sure your store name is available not only on TpT but also on other platforms. Although you may not be thinking about it now, eventually, you may want to create an Instagram account, Facebook page, Pinterest and blog. Make sure your store name is available across all these platforms.
2. Setting up your TpT store
- If you aren’t great at graphic design yet, I highly recommend hiring someone to create a store logo and banner for you. If you feel comfortable in your skills or you aren’t ready to invest in your store just yet, you can find templates on TpT and Canva. Here is a free logo template by Jillian Fernandez!
- There are several basic questions for you: name, location, biography, grades you teach, and the grade level for resources you sell. This is all fairly basic.
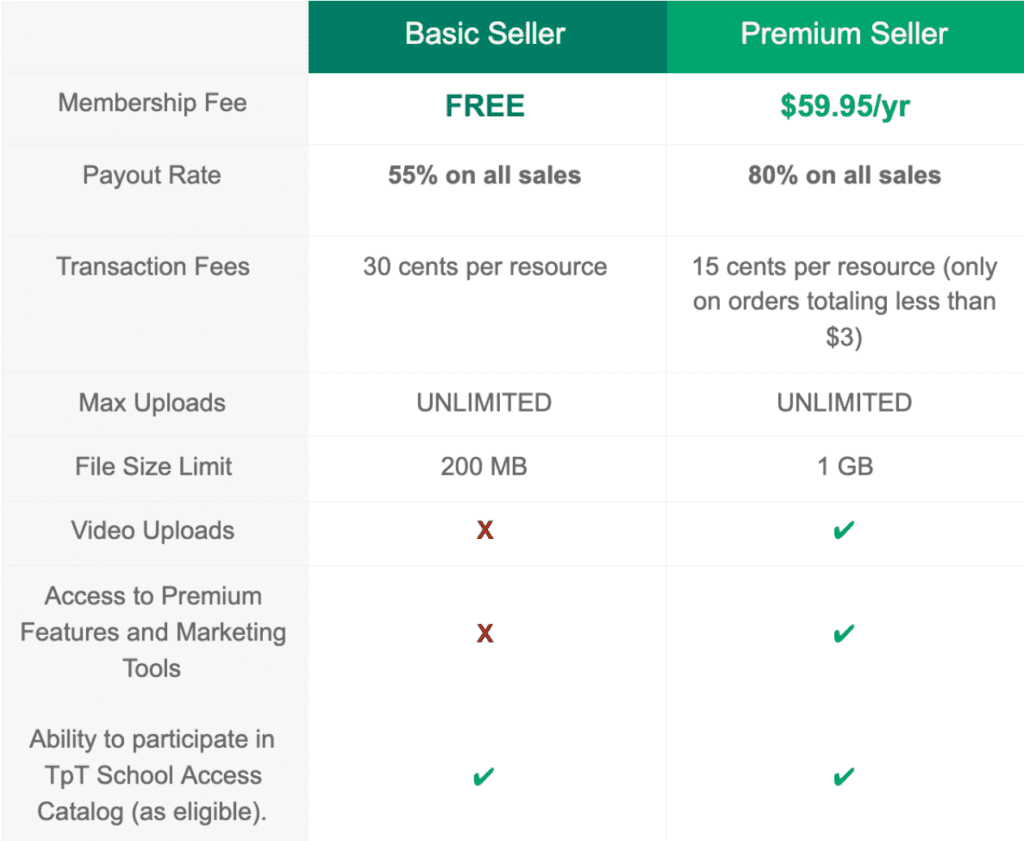
3. Free account vs. Premium account
- This was a no-brainer for me; I knew I wanted to be serious about selling on TpT, so I got a premium account immediately. Some people suggest getting a premium account once you have earned your first $60 (this will cover your premium account for the year), but when you look at the breakdown, you will reach $60 a lot faster with a premium account. Here is a breakdown of the different options.
4. Invest in commercial fonts and clipart
- You don’t need to rush into this. Find a clipart artist that you love. I made the mistake of purchasing items from numerous sellers, which caused my early products to look inconsistent. I wish I had only purchased from one artist. There are tons of incredible artists available on TpT, so take your time to find the perfect style! Once you have decided, download all their free items and start creating! I always put a bunch of items on my wishlist and then purchase them during the sitewide sale (you can save 25%).
5. Create your first products
- Your first product on TpT has to be a free one. This is an excellent opportunity for sellers to find you and see your fantastic work! Make sure to create a great, engaging and helpful product! It should be less than ten pages and must include a thumbnail and a Terms of Use/Credit Page page. To learn more about how I create my products, click here.
These are the first five steps to get you started on your TpT journey! Join our email list for helpful tips, free resources, and exclusive discounts to make your experience even smoother!